Rapid Prototyping and Creative UX Design
- Brendon Steele
- Mar 22, 2025
- 6 min read

Updated: Mar 23, 2025
A detailed outline of the design and development process upgrading the game for AR Foundation and Touch Manipulation.
A breakdown of my thought process enabling rapid prototyping, development, pragmatic decision making and creative design in migrating the game from the Merge Cube to AR Foundation and mobile touch.
Intro
I’ll start with a quick introduction. My name is Brendon Steele. I have over a decade of development experience in 2D and 3D spaces with a particular focus on rapid prototyping and novel touch experiences. This type of work is rewarding to me because it’s close to the user experience, and success is dictated by an eye for usability and interaction. This article will feature my thoughts when problem solving, avoidance of common pitfalls, and creative user interaction design. I’ve refined these techniques over years of development in Unity.
Resurrecting an 8-year old Unity application the do’s and don’ts.
This task can either be straightforward and time-efficient or complicated, risky, and a potential security concern. I’ll briefly mention my high level approach to this problem. I discovered that the Merge Cube SDK was no longer supported and decided to remake the gameplay to function without the need for added peripherals. I cherry-picked a newer LTS version of Unity, verified compatibility with third-party packages. Next, I examined the adoption rates of Visual SLAM versus Lidar SLAM on mobile devices. For a deeper dive into this concept see my other blog coming soon.
How to Preserve the User’s Experience
The original Merge Cube allowed users to hold a Unity App in their hands and rotate it freely intuitively. While the tracking was not perfect and it did require extra development effort to adapt to loss of tracking, the gameplay was very intuitive. Hold the cube in front of the phone camera and balance the ball on top. The challenge is: how do we replicate this level of intuitive gameplay and dexterity without the cube? How do we do this without taking on a huge refactor? How do we ensure that the touch code is smooth, easy, and fun to use? Keep reading to find out.
Start A New Scene
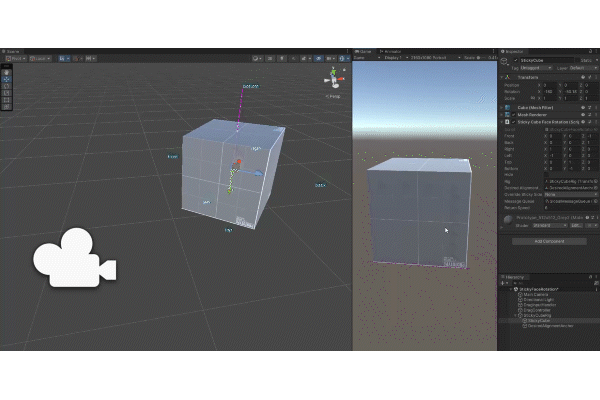
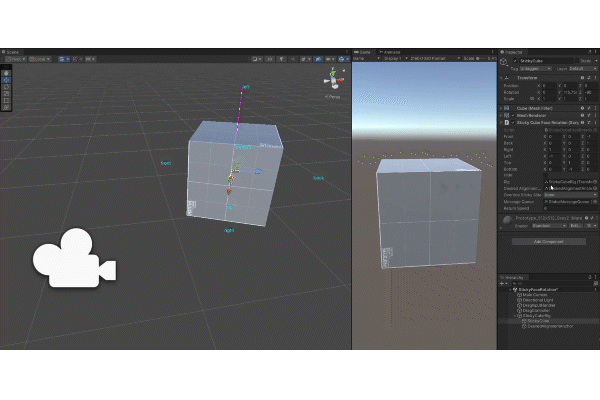
Starting fresh in a new Unity scene has many advantages. With no added objects, development naturally follows best practices. Components and prefabs by default will operate in isolation, unless you take the intentional step to add more objects to the scene. You can return at any time to the scene to verify the tool still works as intended. By minimizing hard references to other objects, you ensure that your tool remains modular and easy to reuse in various situations. Some useful design patterns to explore include the Single Responsibility Principle, the Observer Pattern, and the Singleton Pattern. In this scene I have the default camera and light. I have a scriptable object pub/sub message queue. I have my prefab with StickyCubeFaceRotation and DragController.
Gizmos and Sticky Side
Imagine rotating this cube freely in an AR SLAM world space. You need this sticky side to point perfectly upward to stabilize the ball while you are thinking through your next move. You also need the ability to easily rotate the cube left or right. It quickly became apparent that a new mechanic was needed to help the user stabilize the ball.
Players may need to put the phone down or adjust their grip, causing the ball and gameplay to come to rest. I called this mechanic the sticky side rotation. In essence it represents the ability to pick any side of the cube (the sticky side). Pick any rotation often directly up or directly toward the phone (the target rotation). Then some logic to rotate the cube smoothly from the sticky side to the target rotation. I started with Quaternions rather than EulerAngles to avoid unpleasant edge case rotations. With a swipe left, right, up or down and the above feature, you can address the game from any desired orthogonal angle. Simply say I want the side facing me to look up, down, left, or right.
The Maths
Sticky Side
We can start by defining orthogonal angles. You can use transforms or math for this but consider that the math approach is more efficient as it doesn’t calculate MonoBehaviour life cycle events for each gameObject as well as doesn’t calculate the local transform scale, rotation, position. In fact with the math approach you can rapidly set up a handful of OnDrawGizmos definitions for each value that will run in the editor in the scene view. This draws colored lines, spheres, meshes, words on the screen, and gives you that visual feedback you need for intuitive debug and development.
public void OnDrawGizmos()
    {
#if UNITY_EDITOR
        // Draw labels
        float labelOffset = .04f * transform.localScale.x;
        Vector3 labelOffsetVector = Vector3.up * labelOffset;
        var handleStyle = new GUIStyle();
        handleStyle.fontSize = 14;
        var normal = new GUIStyleState();
        normal.textColor = Color.cyan;
        handleStyle.normal = normal;
        Handles.Label(front + labelOffsetVector, "front", handleStyle);
        Handles.Label(back + labelOffsetVector, "back", handleStyle);
        Handles.Label(left + labelOffsetVector, "left", handleStyle);
        Handles.Label(right + labelOffsetVector, "right", handleStyle);
        Handles.Label(top + labelOffsetVector, "top", handleStyle);
        Handles.Label(bottom + labelOffsetVector, "bottom", handleStyle);

        // Draw desired alignment arrow
        Gizmos.color = Color.magenta;
        Gizmos.DrawLine(transform.position, transform.position + desiredAlignmentVector * transform.localScale.x);

        // Draw sticky side line
        Gizmos.color = Color.magenta;
        Gizmos.DrawLine(transform.position, GetStickySidePosition(GetStickySide()));
#endif
    }
We can represent the six sides of the cube using an enum (Top, Bottom, Left, Right, Front, Back). To determine the best-aligned side (the sticky side), we calculate the dot product between the target direction vector and each of these orthogonal angles. The side with the highest value is the best match. This function is highly efficient, running in O(1) time complexity, making it viable for real-time use every frame when needed.

With the ability to identify the sticky side and pick an arbitrary rotation via the alignment anchor, you can now move the alignment anchor to Vector3.up world position. So finally we can now define as often as every frame one of the 6 sides that we want to point in an arbitrary direction. Then declare it. The smoothness of this animation is accomplished via Quaternion.Slerp() in the update loop with a tweakable threshold that “completes” the animation.
The declaration is idempotent, ensuring that multiple successive state changes won’t break the animation. It simply always works. The smooth animation is handled using Quaternion.Slerp() in the update loop, with a tweakable threshold to control how quickly the rotation completes.
void Update()
{
    if (!lastFrameReturning && returning)
        CalibrateReturnRotation();

    if (returning)
    {
        // Smoothly interpolate back to the original rotation
        transform.rotation = Quaternion.Slerp(transform.rotation, returnRotation, returnSpeed * Time.deltaTime);

        float degreesUntilAnimationComplete = Quaternion.Angle(transform.rotation, returnRotation);

        if (ballIsFrozen && degreesUntilAnimationComplete < CONTINUE_BALL_ROLLING_THRESHOLD)
        {
            messageQueue.Publish(GlobalSlugs.RESUME_AIRBORNE_BALL, "");
            ballIsFrozen = false;
        }

        // Stop adjusting once close enough to the original rotation
        if (degreesUntilAnimationComplete < SNAP_COMPLETE_RETURN_THRESHOLD)
        {
            transform.rotation = returnRotation;
            ClearAnimations();
            messageQueue.Publish(GlobalSlugs.RESUME_AIRBORNE_BALL, "");
        }
    }
    lastFrameReturning = returning;
}
The final feature is the ability to arbitrarily rotate the object via Quaternion.Rotate(). Next we will map touch inputs for SLAM and mobile touch to sensible and timely function calls.
Drag
Using the new Unity Input System, we handle events for OnDragStart, OnDrag, and OnDragEnd.
OnDragStart: We clear any rotations, pause level animations, and temporarily disable ball physics.
OnDrag: We simulate a pseudo grab-and-pull effect using vector math. This is done by projecting the primary touch position outward via Camera.ScreenPointToRay() and Ray.GetPoint(), calculating this for both the last frame and the current frame. We subtract the position of the cube from this projected point's position giving us the direction vector from cube to projected point. Using Quaternion.FromToRotation(), we determine deltaRotation and amplify the effect by squaring this value. The rotation is then applied directly to the cube via StickySideRotation.Rotate().
OnDragEnd: The cube smoothly returns to its target alignment.
protected override void OnDragStart(OnDragData data)
{
    stickyFaceRotation.ClearAnimations();
    messageQueue.Publish(GlobalSlugs.RESUME_AIRBORNE_BALL, "");
    lastFrameOnDragData = data;
    fingerDown = true;
}

protected override void OnDrag(OnDragData data)
{
    lastFrameTouchRay = arCamera.ScreenPointToRay(lastFrameOnDragData.mousePosition);
    Vector3 lastFrameVectorFromCubeToTouchWorldPoint = lastFrameTouchRay.GetPoint(RAY_GET_POINT) - cube.transform.position;

    var thisFrameTouchRay = arCamera.ScreenPointToRay(data.mousePosition);
    Vector3 thisFrameVectorFromCubeToTouchWorldPoint = thisFrameTouchRay.GetPoint(RAY_GET_POINT) - cube.transform.position;

    Quaternion deltaRotation = Quaternion.FromToRotation(lastFrameVectorFromCubeToTouchWorldPoint.normalized, thisFrameVectorFromCubeToTouchWorldPoint.normalized);
    Quaternion doubleRotation = deltaRotation * deltaRotation;

    stickyFaceRotation.RotateCube(doubleRotation);
    lastFrameOnDragData = data;
}

protected override void OnDragEnd(OnDragData data)
{
    stickyFaceRotation.ReturnToDesiredAlignment();
    fingerDown = false;
}
Swipe
We start by clearing cube rotation animations. Next, we determine the direction vector from the cube to the camera along the XZ plane. To do this, we take the cubeToCameraVector and omit the Y-value, giving us cubeToCameraWorldXZPlaneVector.
We then identify the most aligned side using GetMostAlignedSide() and override the sticky side with the side facing the camera. Next, we calculate the left-hand side cross product using Vector3.Cross(), which helps determine the world up and down, but more importantly, left and right relative to the phone’s position and rotation.
Now, we set the desired alignment. For example, if I swipe left, I want the side facing me to rotate right of me and align with my LHS cross vector. Finally, we call StickySideRotation.ReturnToDesiredAlignment() to complete the movement.
protected override void OnSwipe(OnSwipeData data)
{
    stickyFaceRotation.ClearAnimations();
    Vector3 thisFrameCubeToCameraVector = cubeToCameraDirectionVector;
    Vector3 cubeToCameraWorldXZPlaneVector = new Vector3(thisFrameCubeToCameraVector.x, 0f, thisFrameCubeToCameraVector.z);

    CubeSideEnum sideFacingMe = stickyFaceRotation.GetMostAlignedSide(cubeToCameraWorldXZPlaneVector);
    stickyFaceRotation.overrideStickySide = sideFacingMe;
    Vector3 lhsCrossVector = Vector3.Cross(cubeToCameraWorldXZPlaneVector, Vector3.up);

    switch (data.swipeDirection)
    {
        case SwipeDirectionEnum.Up:
            stickyFaceRotation.SetDesiredAlignmentAnchorPosition(Vector3.up);
            break;
        case SwipeDirectionEnum.Down:
            stickyFaceRotation.SetDesiredAlignmentAnchorPosition(Vector3.down);
            break;
        case SwipeDirectionEnum.Left:
            stickyFaceRotation.SetDesiredAlignmentAnchorPosition(lhsCrossVector*-1f);
            break;
        case SwipeDirectionEnum.Right:
            stickyFaceRotation.SetDesiredAlignmentAnchorPosition(lhsCrossVector);
            break;
    }

    stickyFaceRotation.ReturnToDesiredAlignment();
}
Conclusion
I explained my development strategy and process. I also created a performant, and reusable tool for handling orthogonal side alignment of a cube in 3D space. This includes animation, drag and swipe mechanics as well as editor gizmos that provide real-time visual feedback to better understand rotations in action.
Let’s connect!
Comments